JS1
What even is JavaScript?
- JS1
- 12 vs 24 hour clock
- Accessing strings
- Anonymous functions
- Arrow functions
- Assembling the parts
- Classifying data
- Comparing current and target output
- Conditionally executing code
- Dead Code
- Declarations and statements
- Declaring functions
- Errors
- Evaluating expressions
- First test case
- Fixing the error
- Forming sub-goals
- Functions
- Generalising further
- Generalising further
- Identifying missing tests
- Improving the code
- Install a UNIX based operating system
- Install Node with nvm
- Installing Jest
- Interacting with computers
- Interpreting errors
- Interpreting feedback
- Interpreting this error
- Jest's Application Programming Interface
- Logging
- Making a choice
- Ordinal numbers
- Parameterising a function
- Percentages
- Playing computer
- Refactoring
- Refactoring repetition
- Returning from a function
- Reusing the function
- Running scripts
- Saving expressions
- Scope
- Solving Problems with Functions
- Starting a project
- Sub-goal #2
- Terminal interface
- Testing a sub-goal
- Testing frameworks
- Testing Workshop
- Using an interface
- Using packages
- Writing an assertion
JS1 block viewer
This block viewer lets you flick through all the existing blocks in the JS1 folder so you can choose what parts to add to your pages and what parts you might want to create, revise, or leave out.
It's literally just an alphabetical list of whatever is in this folder.
12 vs 24 hour clock
Learning Objectives
We usually write the time in one of two ways: the analogue 12 hour clock or the digital 24 hour clock. The 12 hour clock counts up to 12: it resets at midday. The 24 hour clock counts up to 24: it resets at midnight.
| 2️⃣4️⃣ hour time | 🕛 12 hour time |
|---|---|
| 09:00 | 09:00 am |
| 10:00 | 10:00 am |
| 11:30 | 11:30 am |
| 12:00 | 12:00 pm |
| 13:43 | 1:43 pm |
| 14:00 | 2:00 pm |
We use the notation “HH:MM”. HH is our stand-in for the hours value. MM is our stand-in for the minutes value.
🧩 Stating the problem
Let’s pose a problem: given any time in 24 hour clock, we want to format it as a 12 hour clock time. To achieve this goal, we’re going to implement a function formatAs12HourClock.
Given a time in 24 hour clock
When we call formatAs12HourClock
Then we get back a string representing the same time in 12 hour clock.
🧪 Our tests:
I expect formatAs12HourClock("09:00") to be "09:00 am"
I expect formatAs12HourClock("14:19") to be "2:19 pm"
Accessing strings
Learning Objectives
Given a time string we need to access the first 2 characters of the string which represent the hours.
Strings are zero-indexed.
Index means position, so zero-indexed means we start counting character positions from 0 onwards.
Here are the positions/indexes for "23:00"
| index | 0 | 1 | 2 | 3 | 4 |
|---|---|---|---|---|---|
| character | "2" | "3" | ":" | "0" | "0" |
In JavaScript, we can use square bracket notation to access specific characters in the string using the index.
time[0]; // evaluates to "2"
time[1]; // evaluates to "3"
time[2]; // evaluates to ":"
// etc
Square bracket access will only give a single character. We must use another method to extract multiple characters from the given string.
✂️ Extracting a slice
To extract 1 or more characters from a string, we can use a function called
slice is a function that can take 2 arguments: a start index and an end index. slice will return a section of the string from the start index up to but not including the end index.
time; // holds the value "23:00"
time.slice(0, 2); // will access the characters below
| index | 0 | 1 |
|---|---|---|
| character | "2" | "3" |
So time.slice(0,2) will evaluate to "23" when the time is "23:00".
Finally we must convert "23" to the number 23, otherwise we can’t compare this value properly.
✍️exercise
Think about the numbers 100 and 23. Which one is bigger?
Write code which compares the strings "100" and "23" and tells you which one is bigger.
Does this match your expectation? If not, what do you think is happening?
JavaScript uses different ways to compare values depending on their types. If you compare two strings (which may contain numbers), it will do something different than if you compare two numbers.
We can use the Number function to convert the string into a number.
✍️exercise
Work out how you can convert the strings “100” and “23” to numbers.
Write code which compares the numbers 100 and 23 and tells you which one is bigger.
Anonymous functions
Learning Objectives
We have seen functions written like this:
function convertToPercentage(decimalNumber) {
  return `${decimalNumber * 100}%`;
}
In our Jest test, we wrote a function differently:
function() {
  expect(getOrdinalNumber(1)).toEqual("1st");
  expect(getOrdinalNumber(11)).toEqual("11th");
  expect(getOrdinalNumber(21)).toEqual("21st");
}
✍️👀 Spot the difference
We didn’t give a name to the function in our Jest test.
This is ok, because we don’t need it to have a name. We don’t call the function by name. We passed the function as an
test function. The test function takes the function as a
We can imagine the test function is defined like this:
function test(name, testFunction) {
  // Call the passed test function
  testFunction();
}
Inside test our function is labelled with the name testFunction. It would be labelled this whatever we named it before. Even if we didn’t label it ourselves at all, it is still labelled with the name testFunction inside test.
Because it doesn’t matter what we named the function (because we never call it by name), we didn’t give it a name.
Otherwise, these two functions act the same. The only difference between them is whether we created a variable name for the function in the scope where we defined it.
Arrow functions
Learning Objectives
As we write more code, we are going to write lots and lots of
JavaScript has even shorter ways of writing an anonymous function. These four functions all do the same thing:
function convertToPercentage(decimalNumber) {
  return `${decimalNumber * 100}%`;
}
// We can skip the name of the function if we don't need it to have a name.
function (decimalNumber) {
return `${decimalNumber * 100}%`;
}// We can also skip the keyword 'function'.
// If we do this, we need an arrow between our parameters and the function body.
(decimalNumber) => {
return `${decimalNumber * 100}%`;
};// If our function just returns a single value,
// without needing any other statements in our function,
// we can even skip the return keyword.
(decimalNumber) => `${decimalNumber * 100}%`;This can make it easier and quicker to write functions. It also reduces the number of things we need to read in a function.
Applying all of these techniques, we can rewrite our Jest test with fewer words:
test("works for any number ending in 1", () => {
  expect(getOrdinalNumber(1)).toEqual("1st");
  expect(getOrdinalNumber(11)).toEqual("11th");
  expect(getOrdinalNumber(21)).toEqual("21st");
});
It doesn’t matter whether you use arrow functions or use the function keyword - they work the same.
Not all arrow functions are anonymous - you can assign them to a variable too:
const convertToPercentage = (decimalNumber) => `${decimalNumber * 100}%`;Anonymous vs named refers to whether the function is bound to a name, not whether it was defined with the function keyword or an =>.
Assembling the parts
Learning Objectives
Earlier we defined a sub-goal to find a value for the hours from the time input. We’ve found that Number(time.slice(0,2)) is an expression that evaluates to the hours from time. So we can write an if statement using this expression:
if (Number(time.slice(0, 2)) > 12) {
}
If the time is "23:00" then the expression Number(time.slice(0, 2)) > 12 will evaluate to true and the body of the if statement will be executed.
This if statement is implementing the following part of the diagram from earlier:
Now we can format the string using our approach from earlier:
we’ll need to append "pm" to the string expression and subtract 12 from the hours. So we get the following:
if (Number(time.slice(0, 2)) > 12) {
  return `${time.slice(0, 2) - 12}:00 pm`;
}
The return statement above implements the following steps we set out earlier:
Now we can re-run our assertions from earlier to check our function behaves as target.
Classifying data
Learning Objectives
We can do a lot more than just print text with the JavaScript programming language. First we need to understand some of the rules we need to follow.
A programming language organises data with rules so we understand what we can and cannot do with it. Languages split data up into different categories called data types. A data type is a grouping of data with some particular properties. We will look first at numbers and strings.
Number data type
10 is an example of the number data type.
3.14 is also part of the number data type; both integers (whole numbers) and non-integers are types of number.
-15 is also part of the number data type. Positive and negative numbers, as well as 0, are all types of number.
String data type
A string is a sequence of characters demarcated by quotes.
"Code Your Future";Creating expressions
Think of the numbers 10 and 32. We could ask questions about these numbers, like: What is the sum of 10 and 32?
Another way to say this is what do 10 and 32 add up to? In English we can say this in many ways, but in JavaScript we can say this using numbers and an operator. Just like in mathematics, “the sum of 10 and 32” can be written as 10 + 32:
10 + 32;In JavaScript, + is an operator. An operator represents an operation, or act. It’s a symbol. In this example + represents the operation “calculate the sum of the numbers”. It symbolises addition.
The combination of symbols 10 + 32 is an expression. An expression is a value or any valid combination of values and symbols that results in a single value. We say that expressions evaluate to a single value. So we say that 10 + 32 evaluates to the value 42.
10 is also an expression. It evaluates to the value 10.
"Code Your Future" and "Code Your " + "Future" are also both expressions - both evaluate to the value "Code Your Future".
Comparing current and target output
Learning Objectives
Comparing values
We have learned how to store values in a program and how to access them again when we need them. At some point we will need to compare two values. Often our program will need to change its behaviour depending on that comparison.
For example, think about what happens when you switch on your laptop. Before you do anything else you are asked to enter a password. Whatever you type is compared against a value stored on the computer and if the two match you can carry on using your computer. If they are different you won’t be able to access files or use any programs.
We use comparison operators to compare two expressions. We use the equality operator == to check if two values are the same.
Boolean values
Some values are best represented as strings: any piece of text, a name, address, etc will most likely be stored using the string data type. The number data type can store numbers we use in calculations.
If we’re comparing two things, there are only two different states: true or false. This leads us to the boolean datatype, which only has true or false values. Whenever we compare two values with a comparison operator, we end up with a boolean value: true or false. It’s one or the other. It’s boolean.
// using the strict equality comparison expression

console.log(42 == 10 + 32);
// logs true

console.log(10 * 5 == 60);
// logs false
✍️Exercise - Comparing Values
Create a new file to work in and use console.log to print the values of these expressions. Try to predict the result before you run the code!
// 1
"hello" == "hello"

// 2
"CYF" == "cyf"

// 3
const homeTown = "Newcastle"
homeTown == "Liverpool"

// 4
42 == "42"
Strict Equality
Did anything surprise you about the outputs in that exercise? Number four probably looked strange - the two values have different types, so how can they be equal?
We were using loose equality in these examples. Loose equality compares the value of two terms but not their type. This might work in our code but it also makes our code vulnerable to bugs.
To avoid this we will use strict equality instead. This checks both value and type and will only evaluate as true if both are the same. The strict equality operator is ===.
✍️Exercise - Strictly Comparing Values
===. What do you see that is different in the outputs?Comparing Unequal Values
Often the condition we want to check isn’t about equality. It can be useful to know if a value is greater or less than another. There are four conditions we can check:
value1is greater thanvalue2:value1 > value2value1is greater than or equal tovalue2:value1 >= value2value1is less thanvalue2:value1 < value2value1is less than or equal tovalue2:value1 <= value2
These expressions all evaluate to true or false, just like the equality operators.
Negation
We can also explicitly check that two values are not equal to each other. This might sound strange but it is an important part of comparing values which we will use often throughout this course. The not operator is the symbol ! and it replaces the first = symbol in an equality operator. For example:
// check if two strings are equal
"hello world" === "Hello World!"
// false

// check if two strings are not equal
"hello world" !== "Hello World!"
// true
Conditionally executing code
Learning Objectives
In programming we can use an if statement to execute some code when a given condition is true. In JavaScript, we can write an if statement as follows:
if (condition) {
  // code to execute if condition is true
}
The if statement consists of:
ifkeyword - this is the start of theifstatementcondition- condition is an expression that evaluates to true or false. The condition must be in parentheses:(){}- a code block: any code we want to execute if the condition is true goes inside these braces
We can represent this with a diagram too:
Writing an if statement
We’re going to write some code to implement our password checker example. We’ll use console.log to print messages for the user which will change depending on the password they enter. Let’s start by creating a file called passwordChecker.js to work in and initialising some variables.
const password = "secretword123";
const userInput = "secretword123";
We’ll assume for now that the user has entered the correct password and we’re storing that value in userInput. The password variable contains the value that we want to compare it to. Let’s add an if statement and compare the two variables as our condition.
const password = "secretword123";
const userInput = "secretword123";

if (userInput === password){
  // code will go here
}
Remember to use strict equality!
The next step is to define what should happen if the condition is met. A real password checker would start the process of loading a user’s profile, but in our example we’ll print a message confirming that the values match.
const password = "secretword123";
const userInput = "secretword123";

if (userInput === password){
  console.log("Correct password entered");
}
What happens if the condition is false?
Our code is great at letting the user know they entered the correct password, but they might make a mistake one time. Try changing the value of userInput and see what happens when it doesn’t match password.
That wasn’t very helpful, was it? We’ll look at how we handle things going wrong in more detail in the next few sections but for know we know we definitely don’t want things to fail without telling us anything. We need to tell our program what to do if the values don’t match.
To do this we will use the else keyword. When we add an else block to an if statement we’re saying “if the condition is false do this instead”.
const password = "secretword123";
const userInput = "thisiswrong";

if (userInput === password){
  console.log("Correct password entered");
} else {
  console.log("Incorrect password!");
}
Try running your code again - you should now see “Incorrect password!” printed in the terminal.
Try changing userInput again so it matches password and see what happens now. Note that you will never see both messages printed. If the condition is true then the block after it is executed and the program moves on.
More than two possibilities
We won’t always be dealing with yes/no questions. Sometimes we need to consider additional options. Let’s imagine we have a secret password administrators can use to access anyone’s account.
const password = "secretword123";
const userInput = "thisiswrong";
const adminPassword = "override";

if (userInput === password){
  console.log("Correct password entered");
} else {
  console.log("Incorrect password!");
}
Our code doesn’t specify what should happen if the user enters this admin password. We can change that by adding an else if block after the original condition but before the else block. This is structured the same way as the initial condition.
const password = "secretword123";
const userInput = "thisiswrong";
const adminPassword = "override";

if (userInput === password){
  console.log("Correct password entered");
} else if (userInput === adminPassword){
  console.log("Admin access granted");
} else {
  console.log("Incorrect password!");
}
We will still only ever see one block being executed, but now our program can handle more than two possibilities. The order of these conditions matters. If userInput === password the first block will be executed and the program will move on; we will only check userInput === adminPassword if that initial condition is false, and we will only execute the code following else if both conditions are false.
Dead Code
Learning Objectives
As software engineers, we have a responsibility to build code that not only fulfils the required behaviours of the programme but is part of a well-structured and “clean” codebase.
What is meant by “clean”?
Clean code generally means code that is:
Understandable for other programmers. We achieve this through good variable naming, avoiding chaining too many methods in one line, good choice of syntax depending on the data type being used, etc.
Avoids duplication. Not repeating code where it could be a reusable function, making more efficient choices in our conditional logic, using loops where relevant, etc.
Passes all tests (if you have tests in the repository).
And importantly, contains a minimal amount of “moving parts”. Removing any bulk that isn’t contributing to the behaviour we want to achieve. This means watching out for “dead code”.
Keeping to clean code helps us collaborate better, code more efficiently and accurately, and make programmes more readable.
It means products we build can be maintained in the future without wasting more developer time than necessary trying to work out what the code is doing.
What is meant by “dead” code?
A segment of code that is no longer used.
As a programme evolves there might be many changes, fixes, feature additions made to the code. There is a high probability that when those changes were made to the code, there was no time to “clean” up the existing or old code. This can lead to code being left in the repository that no longer has purpose, whether by accident or on purpose.
One common way to identify dead code in our programmes is by using a
When we remove dead code we can reduce the “bloat” of our code, making it easier to maintain and improving debugging processes. It means we don’t need to read and understand code that isn’t used.
✍️Exercise
📖 Read this more detailed breakdown of dead code from Devopedia: https://devopedia.org/dead-code.
❓ Answer the following questions:
- What makes a piece of code count as “dead code”?
- What is the difference between “redundant code” and “unreachable code”?
- Why do we want to remove “dead code” as much as possible? What are the benefits of removing it?
- What tool makes finding “dead code” in our repositories easiest? (Hint: Do you use this tool already to code?)
💡Tip
In the related backlog item, you will look for dead code in an existing code base and handle it appropriately. Have fun!
Declarations and statements
Learning Objectives
A variable declaration is an example of a
let versionNumber = "2.0.0"; // declaration
versionNumber = "2.0.1"; // statement
The code above has one variable declaration and one statement.
- The first line is a declaration - creating a variable
versionNumberwith a value of"2.0.0" - The second line is a statement -
reassignment🧶 of the value of🧶 reassignmentReassignment means changing the value associated with an identifier. versionNumberto"2.0.1"
In this example, we’ve used the let keyword to declare a new variable.
The let keyword allows us to create new variables like the const keyword.
However, we can reassign the value of a variable that is declared with the let keyword.
If we’d used const to declare versionNumber, we wouldn’t be allowed to reassign it a new value.
In JavaScript, we build up programs by combining declarations and statements.
Declaring functions
Learning Objectives
We have our pseudocode from the previous section and it’s time to write our first function.
// Already have the password stored in a variable
// Receive the value which the user entered
// Compare the two values
// If they match print "Correct password entered"
// If they don't match print "Incorrect password, please try again"
It can be tempting to jump straight to the interesting bit, but just like any other set of instructions we need to start at the beginning. In this case we need to declare a variable to store our password.
// Already have the password stored in a variable
const password = "secretword123";

// Receive the value which the user entered
// Compare the two values
// If they match print "Correct password entered"
// If they don't match print "Incorrect password, please try again"
To create our function we need to use a function declaration. In JavaScript we declare functions like this:
function checkPassword(input) {}The function declaration consists of the following syntactic elements:
functionkeyword - begins the function declarationcheckPassword- the name of the function()- any input to the function will go between these parentheses. We still need them if a function has no input, we just leave them empty. We call these inputs parameters.{}- the body of the function is written inside the braces. The code we want to execute will be written here.
📝Functions in other languages
We can add our function declaration to our code.
// Already have the password stored in a variable
const password = "secretword123";

// Receive the value which the user entered
function checkPassword(userInput){
  // Compare the two values
  // If they match print "Correct password entered"
  // If they don't match print "Incorrect password, please try again"
}
We changed a couple of things here:
- Instead of
inputwe named our function’s parameteruserInput. Just like any other variable, we want to use meaningful names which tell us what the value represents. - We wrapped the braces
{}around the other steps in the pseudocode. These lines say what we want the function to do, so we place them inside it. - We indented those lines inside the braces. Indentation gives us a visual indication of where a block starts and ends.
Now it’s time to fill in the detail of what our function will do! We have already seen how to do this using an if statement in the last sprint.
✍️Exercise: Complete the body of the function
Add the code to complete the steps described by the pseudocode. Remember to line the comments up with the code!
Example solution:
// Already have the password stored in a variable
const password = "secretword123";

// Receive the value which the user entered
function checkPassword(userInput){
  // Compare the two values
  if (userInput === password) {
    // If they match print "Correct password entered"
    console.log("Correct password entered");
  } else {
    // If they don't match print "Incorrect password, please try again"
    console.log("Incorrect password, please try again");
  }
}
Now we have defined our function we can call it in exactly the same way as we called Math.round() before. Try it with different inputs to check that it works!
checkPassword("secretword123");
// "Correct password entered"

checkPassword("WrongGuess99");
// "Incorrect password, please try again"
📖Definition: Arguments
When we call a function we have a special name for the values we place in the parentheses: arguments. When we provide a value as an input we are passing an argument to the function.
There is an important distinction between parameters and arguments:
- A function’s parameters are the placeholder values used when we define the function
- A function’s arguments are the actual values in the program when we call the function
Errors
Learning Objectives
Recall that a programming language is a set of rules for writing computer instructions. What would happen if we break those rules?
Let’s take an example:
| |
On line 1, we have a variable declaration, but the string has a missing " We’re not obeying the syntactic rules for JavaScript: the rules for writing expressions, statements and other parts of the language.
When we execute the code above, we get this:
const firstName = "Francesco;
                  ^^^^^^^^^^^

Uncaught SyntaxError: Invalid or unexpected token
We get a SyntaxError message. This error message is telling us that we’ve broken one of the rules of the language. In this case the interpreter didn’t expect to see the semicolon - it needs us to add the missing " before the expression makes sense.
✍️Exercise: Predict and Explain
Each block of code in this activity is broken. Create a new file to test these expressions in, but before you run each block of code:
- Predict the error.
- Explain why the error happened.
const volunteer = "Shadi";
const volunteer = "Abdi";
const volunteer = "Shadi";
volunteer = "Hinde";console.log(Math.round(10.3);Evaluating expressions
Learning Objectives
💡Tip
Computers work by storing and performing operations on data.
Computer programs are built from many expressions. We must understand how expressions are evaluated to understand how computer programs are executed.
We can take an expression like 36 * 45 and ask what it evaluates to. If we know what the * operator represents (multiplication) and if we understand the arithmetic rules represented by the operation we can evaluate this expression ourselves.
Happily, computers can evaluate expressions for us.
NodeJS is an application that runs JavaScript programs. In other words, NodeJS can understand and execute programs written in JavaScript. One feature of Node is the REPL.
📝Note
REPL is a special type of program that stands for:
- Read - Users enter some code that Node will read
- Evaluate - Node will then evaluate this code
- Print - Node will print the result to the terminal
- Loop - Node will loop back to the beginning and prompt users to input some more code
With a REPL we can run pieces of code and look at what happens.
{title=“Definition: REPL” AlertType=“definition”}
We input JavaScript instructions that are then executed by NodeJS. The REPL replies with, or prints out, the result of this execution.
Type each of the following expressions into the REPL one at a time and then press enter to check the result.
10 + 3232 / 10📝Note
In this activity, you’ll check you’re ready to use the Node REPL on your machine.
- Open the terminal on your computer
- Check you’ve got Node installed on your computer
- Start the Node REPL in your terminal
- Enter the expressions and evaluate them using the Node REPL {title=“Activity” AlertType=“activity”}
If you don’t know how to do any of the steps above, then try searching for an appropriate command online. Searching for things when you’re stuck is super important part of being a developer!
📝Note
Create your own expressions and enter them into the Node REPL.
🧠 Before you type in the expressions, predict what the REPL output will be. Write your prediction down and compare it to the outcome. {title=“Activity” AlertType=“activity”}
First test case
Learning Objectives
🎯 Goal: Write a test for the case below, using Jest:
Case 1 💼
Our first case is that the ordinal number for 1 should equal "1st".
We can create a file called get-ordinal-number.test.js and write our first test there.
We can use documentation to work out how to write our first test using Jest.
get-ordinal-number.test.js:
test("converts 1 to an ordinal number", function () {});Let’s break down this syntax.
The test function is part of the Jest API, a function we use to perform a particular task.
In particular, we’re using test to create a test case.
Before, we could use Math.round and console.log because Math and console are provided for us by Node.
test isn’t provided by Node, but when we ask Jest to run our tests, it will make sure the test function exists and that our code can use it.
Let’s break down the arguments we’re passing to test:
- 1st argument:
"converts 1 to an ordinal number", a string which describes the behaviour we’re testing for - 2nd argument:
function() {}, we will write some assertions in thisfunction() {}to check the behaviour
⚖️ Creating assertions
We need to write an assertion inside the body of function() {} inside get-ordinal-number.test.js
get-ordinal-number.test.js:
test("converts 1 to an ordinal number", function () {});💡Recall
In this example, we want to check that the following is true:
We expect getOrdinalNumber(1) to be "1st"
An assertion in Jest looks like this:
expect(currentOutput).toEqual(targetOutput);The function toEqual is used to check that the current output of getOrdinalNumber(1) and the target output of "1st" are equal to each other.
toEqual is just one example of a function called a matcher.
A matcher is a function we use to compare values in Jest.
So the whole test looks like this:
test("converts 1 to an ordinal number", function () {
  expect(getOrdinalNumber(1)).toEqual("1st");
});
👟 Running tests
We can try running the file get-ordinal-number.test.js with node in the following way:
node get-ordinal-number.test.jsbut we get an error:
ReferenceError: test is not definedGoogling “ReferenceError JavaScript”, MDN tells us this is because we’re referring to a variable that doesn’t exist. This is because test isn’t defined anywhere in the file.
We need to execute this file so that the Jest API is available in our file. We can do this by running the test file using Jest: we do this using an npm script.
The “scripts” section of the package.json is where we can write useful commands we’ll use in our project. We can add a “scripts” section to the package.json so that it reads as follows:
| |
Finally, we’ll need to run our tests.
Now we can run the command npm test.
When we execute the command, npm test, we will run npm, and npm will look inside the “scripts” section of the package.json and look up the command for “test” - in this case, “jest”. npm will then run “jest”.
We can’t ourselves just run jest on the command line, because it isn’t installed in a place our terminal knows about. But when npm runs a script, it will make sure all dependencies installed for the project are available.
Fixing the error
Learning Objectives
We saw this error:
TypeError: Assignment to constant variable.Now that we understand it, let’s fix it.
If a variable has been declared to be a constant we are not allowed to reassign it, but that’s what we’re attempting to do on line 11:
| |
✍️Exercise: Fix the error
Using what you have learned about variables already in this sprint, try to fix the error.
If you see a different error message you can apply the same techniques we used in the last section to understand it.
Forming sub-goals
Learning Objectives
For formatAs12HourClock our strategy for inputs like "23:00" involves checking if the hours value is less than 12. For this purpose, we can use the greater than comparison operator >.
> will check if the value on the operator’s left side is less than the value on the operator’s right side.
So 3 > 12 evaluates to false, as 3 is not greater than 12.
So provided we have an expression for hours, we can write an if statement as follows:
if (/* here goes an expression here that evaluates to the hours */ < 12) {
  // do code to format the 12 hours
}
To complete the logic, we can form a
Any time we’re solving a problem, we can define a goal - a thing we need to achieve to consider the problem solved. We can break a problem into smaller problems, each with its own sub-goal. The problem-solving process involves continually breaking down problems into smaller manageable problems, each with its own sub-goal.
For the implementation of formatAs12HourClock, we can form a sub-goal as follows:
🎯 Sub-goal: Find the hours value from the
timeinput
Functions
Learning Objectives
When we are writing programs we often find ourselves needing to do the same thing over and over again. Think back to our password checker from the previous sprint: there are lots of places where you need to enter a password!
We could re-write the code to check a password every time we needed to use it but that wouldn’t be very efficient. It would take a long time to write and there’s a chance we could make a mistake and introduce a bug. It would be much easier if we could write the code once and reuse it anywhere it was needed.
This applies to any repeated process. Let’s look at how we can round a decimal to the nearest whole number.
Reusing instructions
There is no operator for rounding a number in JavaScript, but we will want to round numbers again and again. We can use a function to do this. A function is a reusable set of instructions.
We don’t need to declare this function ourselves. JavaScript comes with many built-in functions, ready for us to use, and rounding is so common that there is already one for it: Math.round.
Functions usually take inputs and then apply their set of instructions to the inputs to produce an output. Math.round takes a number as an input and produces the nearest whole number as its output. Because the number is an input, and not fixed inside the instructions, Math.round can round any number we give it, not just 10.3.
✍️Exercise: Using a function
Create a new file to work in and add the following line:
console.log(Math.round);Take a look at the output in the console:
[Function: round]
This is telling us that Math.round is a function.
Calling a function
For our function to work, we need Node to read the instructions and execute them. Execution simply means the computer will run the code with the instructions in it. Update your code to add some extra information.
console.log(Math.round(10.3));Notice the ( and ) brackets after the name of the function and a number inside the brackets. These brackets mean we are calling the function. The number inside the brackets is the input we’re passing to the function.
📖Definition: Calling a function
Math.round(10.3) is a call expression; read this as:
“apply the set of instructions for Math.round to the number 10.3.”
If we type Math.round(10.3) then we get the result 10. So we say that Math.round(10.3) returns 10.
A call expression is an expression which evaluates to the value returned by the function when it is called. So the expression Math.round(10.3) evaluates to the value 10.
If we assign that expression to a variable, or use it in a string, we’ll get the value 10. We can use this value just like any other that we store in a variable.
✍️Exercise: Calling functions
- Update your code from earlier to store the result of calling
Math.round(10.3)in a variable and print the variable usingconsole.log - Create a second variable to store the result of
Math.round(4.2)and print the sum of the two values.
Example solution:
roundedNumber = Math.round(10.3);

console.log(roundedNumber);firstRoundedNumber = Math.round(10.3);
secondRoundedNumber = Math.round(4.2);
console.log(firstRoundedNumber + secondRoundedNumber);Generalising further
Learning Objectives
In English, ordinal numbers mostly follow the same pattern.
Numbers ending in 1 will generally have an ordinal number ending in “st”.
Here are some examples of this pattern,
1st, 11th, 21st, 31st, 41st,…
All the numbers ending in 1 will continue to end in "st", with the exception of 11.
11 is slightly different and ends with a "th".
We can now update our test case to check that getOrdinalNumber works for lots of different numbers ending in 1.
get-ordinal-number.test.js:
| |
We’ve also updated the test description because we’re adding more assertions and checking slightly different functionality.
✍️🔧 Implement
getOrdinalNumber so it passes the test case above.Generalising further
Learning Objectives
🧰 Handling outliers
We can now implement functionality for getOrdinalNumber.
Our strategy might be something like this:
Most of the time we just need to return the number with “st” on the end.
However, 11 is an outlier: it doesn’t conform to this pattern.
So our current strategy for this test case will be to check if the number is 11 first and do something differently ( return "11th" ): otherwise we return the default value of num with "st" on the end.
Here’s the implementation:
| |
🧭 Future strategies
Now, we’ve handled any numerical inputs ending in 1. We can try to build up functionality for any number ending in 2.
We can start by adding a test case that only asserts something about the input of 2.
We cannot add this assertion to the first test case. The first test case checks for inputs that end in a 1. To check the case when the input ends in 2, we need to introduce a new test case.
| |
Check the test output
Here’s the test feedback for the test above: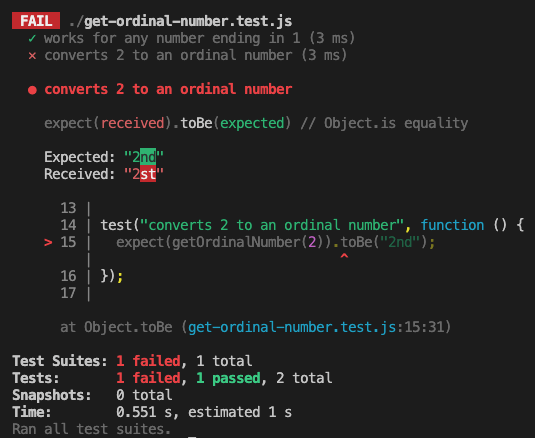
Play computer with getOrdinalNumber when it is called with an input of 2
Double check you agree with the test feedback in this case.
Before coding, outline a strategy for handling the second test case.
✍️Further assertions
getOrdinalNumber works for other numerical inputs ending in 2.We know that this doesn’t solve all cases (e.g. it will give the wrong answer for getOrdinalNumber(2)), but it’s a start, and we have a test-case showing that it works in one case.
This points out a limitation of tests. They only test the cases we wrote tests for. Right now, all our tests are passing, but we know our solution doesn’t work for all inputs!
In order to generalise our solution (to make it work “in general” rather than just for one specific case), It’s important to think about what different groups of inputs we may expect.
Identifying missing tests
Learning Objectives
We started off writing one test for our code - checking that it correctly handled the input 08:00. We wrote an implementation that passed all our (1) tests!
Then we realised there was a bug - it didn’t handle times after midday correctly. So we wrote another test - for the input 23:00. We saw our implementation failed that test. And we fixed it. And we had an implementation that passed all our (2) tests!
When will we be happy that our implementation works for all possible inputs? When do we have enough tests?
Groups of input
One way to approach this is to think about what groups of input our problem may have.
We’ve already identified two examples of groups of input to the problem of converting 24 hour clocks to 12 hour clocks: Times before midday and times after midday.
One way to find extra cases to consider (and extra tests to write) is to try to think of different groups of input.
For example, some times are exactly on the hour (end in :00) and other times have a non-zero number of minutes.
✍️exercise
Set a timer for 5 minutes. Write down as many groups of input to this problem as you can. Write an example assertion for each one.
If you find any bugs in the implementation, go fix them!
Edge cases
Another way to consider this question is to think about what edge cases there are in the problem.
📖Definition: edge case
An edge case is an unusual value which may need special treatment.
Some examples are: the minimum value, the maximum value, and the boundary between two groups of input.
- Some example edge cases for this problem are:
00:00- The minimum time, which is
12:00 amin 12 hour clock.
This is also the only hour that is bigger in 12 hour clock than 24 hour clock. 24:00- The maximum time.
12:00- Where time changes from am to pm. The edge between morning times and afternoon times.
Often these edge cases are where bugs happen.
✍️exercise
Set a timer for 5 minutes. Write down as many edge cases of input to this problem as you can. Write an example assertion for each one.
If you find any bugs in the implementation, go fix them!
Improving the code
Learning Objectives
Refactoring
Now the assertions pass: in other words, our function’s current output matches with the target output described in the assertions.
In addition to implementing functionality, we also need to continually improve the code quality. Other developers will continue to read our code so it’s vital our code is readable by other humans.
💡Definition: refactoring
Let’s consider our working implementation so far:
Currently, we’re using the same expression twice: Number(time.slice(0, 2)). This means we’re calling the functions Number and slice twice.
Additionally, expressions embedded inside curly braces and parentheses can often be difficult to read. In this situation it makes sense to label the recurring expression so we can reuse it wherever we need to in our code.
Let’s create a variable called hours and assign to it our expression’s result.
function formatAs12HourClock(time) {
  const hours = Number(time.slice(0, 2));

  if (hours > 12) {
    return `${hours - 12}:00 pm`;
  }
  return `${time} am`;
}
Note that the function’s behavior hasn’t changed: it still returns the same outputs from the given inputs. We’ve just improved the implementation without changing the underlying behaviour.
🐛 Fixing bugs
Here is our current implementation of formatAs12HourClock:
function formatAs12HourClock(time) {
  const hours = Number(time.slice(0, 2));

  if (hours > 12) {
    return `${hours - 12}:00 pm`;
  }
  return `${time} am`;
}
However, formatAs12HourClock currently has a
function formatAs12HourClock(time) {
  const hours = Number(time.slice(0, 2));

  if (hours > 12) {
    return `${hours - 12}:00 pm`;
  }
  return `${time} am`;
}
a) Write an assertion to check the output of formatAs12HourClock when it is called with an input "17:42"
b) Check the assertion output and try to explain what the bug is
formatAs12HourClock.formatAs12HourClock, re-run all the assertions to check you’ve not broken any previous functionality.Install a UNIX based operating system
Learning Objectives
If you get stuck on any of the below or above instructions, please post in your class channel on Slack.
⚠️CYF does not support Windows!
We have found that we don’t reliably have volunteers at class who can debug Windows problems, and they frequently come up, stopping trainees from making progress.
We do not support Windows so as to not waste lots of trainee and volunteer time. We have made this decision even though Windows is a popular operating system and has features like WSL which help to get experience with Unix.
If you have a Mac or Linux machine already, you already have a UNIX based operating system. All CYF-supplied laptops run Mac OS or Linux. If you have your own machine and it runs Windows you will need to set up a Linux partition.
If you have still not done this you must do it now. If you need help doing this, post in Slack, or bring your laptop to a CYF co-working space to get support. It’s normal to need help with this process. The Ubuntu website has instructions which you can follow to dual-boot your system.
💡Tip
If you are enrolled as a trainee and you don’t have a suitable computer, Code Your Future can lend you a laptop which runs Mac or Linux. You can find information about borrowing laptops on our signposts site.
Install Node with nvm
Learning Objectives
If you get stuck on any of the below or above instructions, please post in your class channel on Slack.
💡tip
node -v in a terminal. The command should return a version number. If it does, you can skip the next steps.🐧 On Ubuntu
- Install nvm by running the following commands in your terminal:
curl -o- https://raw.githubusercontent.com/nvm-sh/nvm/v0.40.1/install.sh | bash- After the installation is complete, you’ll need to source the nvm script by running:
source ~/.bashrc- Install the latest LTS version of Node.js by running:
nvm install --lts- Check that you have successfully installed Node.js by running:
node -vYou should see a version number like v22.11.0.
- Check that you have successfully installed npm by running:
npm -vYou should see a version number like 10.9.0.
On Mac
- Install the the Xcode Command Line Developer Tools by running the following command in your terminal:
xcode-select --installThese may already be installed, in which case you will see “xcode-select: note: Command line tools are already installed.” and can continue to the next step.
- Create a (Non-Login Interactive) Shell Configuration File:
touch ~/.zshrc- Install nvm:
curl -o- https://raw.githubusercontent.com/nvm-sh/nvm/v0.40.1/install.sh | bash- After the installation is complete, you’ll need to source the nvm script by running:
source ~/.zshrc- Install the latest LTS version of Node.js by running:
nvm install --lts- Check that you have successfully installed Node.js by running:
node -vYou should see a version number like v22.11.0.
- Check that you have successfully installed npm by running:
npm -vYou should see a version number like 10.9.0.
💡Protip
Installing Jest
Learning Objectives
Jest is a package used to help us to write and run test cases in JavaScript. Our next step will be to figure out how to install the Jest package on our machine, so that we can use it in our project.
We can find out more about the Jest framework from the documentation online.
In the Getting started section of the documentation, Jest gives us the following command:
npm install jest --save-dev
Let’s break down the different parts of this command.
npm-npmis the package management tool we are using, so we need to run it.install-npmhas a subcommand calledinstall. We use it to download a package from the npm registry onto our machine and install it.jest- this is the name of the package we want to install on our machine.--save-dev- this means the package is needed for development but not needed in production. Our ordinal app doesn’t needjestto run, but we need it to help us develop it.
So overall we can think of this command as saying: “Please go to the npm database, find the Jest package and install it on my local machine”
Let’s execute this command in the same directory as the package.json.
To double check we’re in the correct directory, we can run pwd:
$ pwd
.../The Docs/ordinal-testing-example
pwd is telling us we’re in the ordinal-testing-example directory.
We need to double check the package.json is also there too.
$ ls
package.json
Now we can execute the command
npm install --save-dev jestOur project structure will now look as follows:
ordinal-testing-example
├── node_modules
├── package-lock.json
└── package.json

1 directory, 3 files
After running the command, we now have a directory called node_modules in our project too.
The
node_modulesdirectory contains all the code from thedependencies🧶 we installed in our project. You won’t need to look inside the🧶 dependenciesA dependency is a package that your project depends upon. node_modulesdirectory - you just need to know it contains the code for Jest and any other dependencies we install in our project.
Running the npm command also updated our package.json file for us:
{
  "name": "week-4-test-example",
  "description": "An example application showing how to write tests using the jest framework",
  "devDependencies": {
    "jest": "^29.5.0"
  }
}
We’ve now got some additional information inside the package.json:
"devDependencies": {
  "jest":  "^29.5.0"
}
✍️🕹️ Follow along
Install Jest on your local machine. Double check you’ve got the correct files and folders written to your local machine.
Interacting with computers
Learning Objectives
Modern computers are complicated: it would be too difficult and time-consuming to list all the components that make up a modern computer. So to build our mental model, we will use this simple definition of a computer:
📖Definition
A computer is a device used to store and perform operations on data.
Interpreting errors
Learning Objectives
An error is thrown
Let’s revisit our password checker, but this time we’ll create a variable to hold our response and print it at the end:
| |
When we run the file with Node we get an error in the console:
% node passwordChecker.js

/Users/yourname/cyf/passwordChecker.js:11
  response = "Incorrect password!";
           ^

TypeError: Assignment to constant variable.
    at Object.<anonymous> (/Users/colinfarquhar/clients/cyf/content_testing/passwordChecker.js:11:12)
    at Module._compile (node:internal/modules/cjs/loader:1829:14)
    at Module._extensions..js (node:internal/modules/cjs/loader:1969:10)
    at Module.load (node:internal/modules/cjs/loader:1552:32)
    at Module._load (node:internal/modules/cjs/loader:1354:12)
    at wrapModuleLoad (node:internal/modules/cjs/loader:255:19)
    at Module.executeUserEntryPoint [as runMain] (node:internal/modules/run_main:154:5)
    at node:internal/main/run_main_module:33:47

Node.js v25.9.0
📖Definition: Throwing Errors
When an error is thrown the program stops. For errors like this one where there is a fundamental problem in the structure of the code this is unavoidable, but in some situations we can let the user know something went wrong without crashing the program. This is called catching an error and we will learn more in a later module.
When an error like this is thrown an error report is sent to the user. It will act like a map for us and lead us to where the error happened.
As programmers we will see a lot of errors. It’s useful for us to be able to read them.
Interpreting the output
Each line of output here tells us something useful.
The first line is:
/Users/yourname/cyf/passwordChecker.js:11
Your output was probably different. But it will have the same parts: some text, then a colon (:), then a number.
✍️Exercise: Locating the error
Work out what the parts of this line mean.
Why are they different in this example than on your computer?
How can we use both pieces of information?
Often, looking at one line of a file is enough to understand what’s wrong. The error message gives us the file name (passwordChecker.js) and the line number (11) so we can identify exactly where the problem is. It also shows us a copy of the line that caused the problem:
response = "Incorrect password!";
Then the output tells us the error message:
TypeError: Assignment to constant variable.
We may not know what this means yet, but it’s something we can learn about.
Each line starting with “at” is showing us a “Stack trace”. We’ll skip over this for now. In the future we’ll see how it can be useful to us.
Finally, we have this line:
Node.js v25.9.0
✍️Exercise: Identifying our tools
Interpreting feedback
Learning Objectives
We currently have a project structure like this:
week-4-test-example
├── get-ordinal-number.test.js
├── package.json
├── package-lock.json
└── node_modules

1 directory, 3 files
And get-ordinal-number.test.js
looks like this
test("converts 1 to an ordinal number", function () {
  expect(getOrdinalNumber(1)).toEqual("1st");
});
After running the test above, we should get feedback indicating whether or not the test has passed.
✍️Predict and explain
🚢 Defining the function
At the moment, our test feedback gives the following:
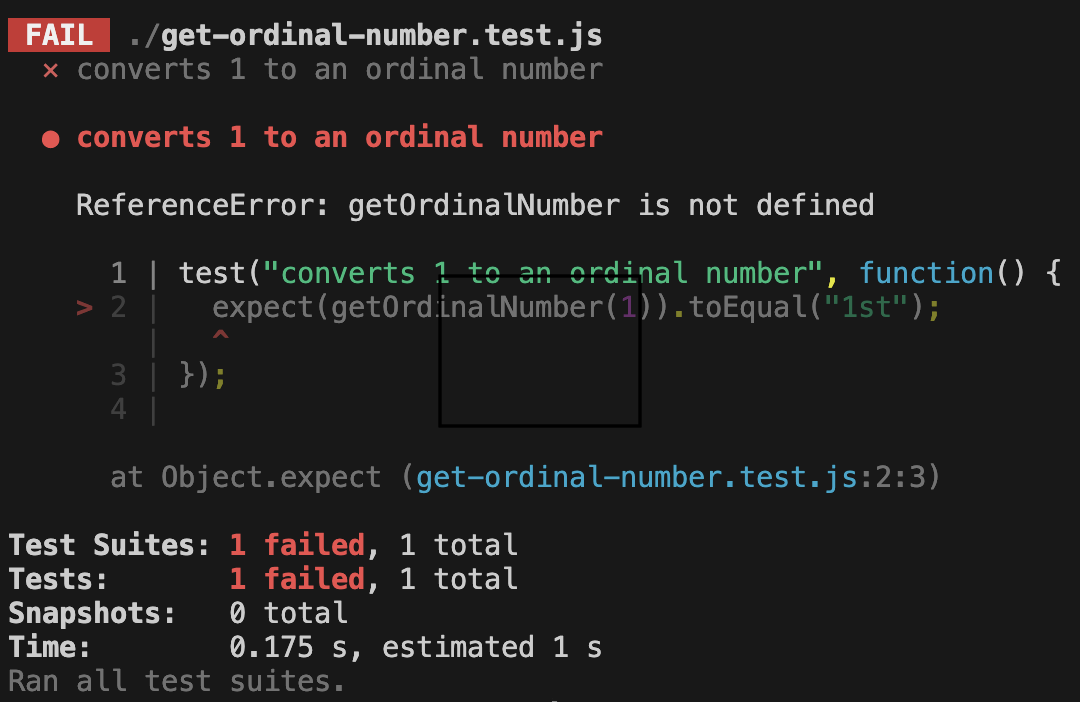
Just like we saw when the test function wasn’t defined, the test code is throwing a
This means that we haven’t defined a function named getOrdinalNumber, but we’re trying to use it.
To fix this, we can declare getOrdinalNumber.
function getOrdinalNumber() {}

test("converts 1 to an ordinal number", function () {
  expect(getOrdinalNumber(1)).toEqual("1st");
});
Now we can run the tests again and check the test feedback.
Assertion errors
We now get the following feedback:
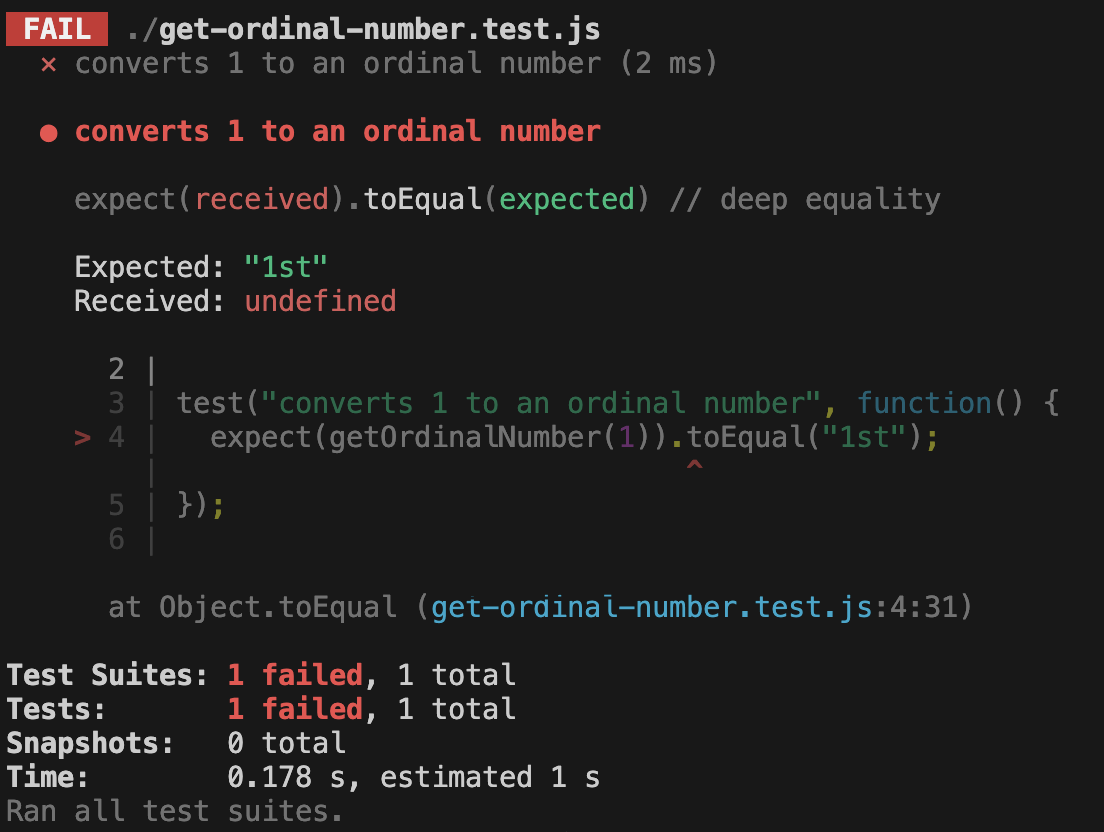
Jest tells us 3 main things:
- The test case that failed
- The target output and the current output
- The line number where error occurred
Jest defines Expected and Received in the test feedback:
- Expected: “1st”
- Received:
undefined
✍️exercise
What are the values of Expected and Received in the test output?
How do Received and Expected match up with the target output and expected output ?
What line number did the test case fail on?
Avoiding repetition
When we wrote console.assert tests before, we ended up extracting variables because we were re-using values.
Without Jest, this assertion would probably have looked more like:
const input = 1;
const targetOutput = "1st";
const currentOutput = getOrdinalNumber(input);
console.assert(
  targetOutput === currentOutput,
  `Expected ${targetOutput} but got ${currentOutput}`
);
Because Jest makes a useful error message for us telling us what the target and current outputs are, we could write this all in one line. We didn’t need a variable so we could pass "1st" both to getOrdinalNumber and into the message.
Jest helped us to avoid writing more repetitive code.
Passing getOrdinalNumber
We can now pass the test by implementing functionality for the first test case. We could write the following:
get-ordinal-number.test.js:
| |
Interpreting this error
Learning Objectives
We saw this error - let’s try to understand it:
TypeError: Assignment to constant variable.Knowing what we changed
It can be useful to remember when our code last worked, and what we changed since then.
💡Tip: Commit history
Source control can help here.
If you commit your code every time you make something work, you can use git to easily see what changed since your last commit.
Everything worked until we made the refactor in the last section. The error appeared when we made the changes. The problem is that we made changes in a few places.
💡Tip: Check things often
Run your code very often.
If we changed one thing since our code last worked, we know what change is the problem. If we have written 100 lines of code since we last saw it work, we have 100 possible problems.
Interpreting the error message
The error message tries to tell us useful information:
TypeError: Assignment to constant variable.When we get an error, we should make sure we understand all of the words in the error message. If we don’t, we should look them up or ask someone.
✍️Exercise
For each word in this error message, write down what it means.
If you don’t know a word, look it up.
Make sure you understand each word. Make sure you could explain the word to someone without reading the answer to them.
Expand for example definitions - only expand this after you have written yours down. Compare your answers with these.
- TypeError - If we Google “JavaScript SyntaxError”, MDN tells us this is “an error when an operation could not be performed”. It goes on to say they can be thrown when “attempting to modify a value that cannot be changed”. We may be trying to modify something when we aren’t allowed to do so.
- Assignment - If we Google “JavaScript Identifier”, the first hit from MDN talks about “assigning a value to a variable or property”. That’s exactly what we’re trying to do on line 11.
- to is a standard English word with no special meaning.
- constant - If we Google “JavaScript constant”, MDN tells us that “the value of a constant can’t be changed through reassignment using the assignment operator”. It also references the
constkeyword which we use earlier in the program. - variable - We learnt about this already in this course - a variable is used to store a piece of data in a program.
Reading that back, we can rephrase this error message:
We tried to modify something which we weren’t allowed to modify. We tried to assign a new value to the response variable on line 11, but because it was declared using the const keyword its value can’t be changed.
💡Tip: Googling technical terms
Jest's Application Programming Interface
Learning Objectives
With Jest installed, we need to figure out how to use the Jest framework to write tests.
This means we need to look at
API stands for
- Application
- Programming
- Interface.
We’ve encountered the word interface already.
But we can break down each word in this acronym to understand it altogether.
An application is a program or piece of software designed to serve some purpose.
Programming refers to the process of writing code or software.
An 🕹️interface is a shared boundary between two or more systems.
We’ve encountered several functions like console.log and Math.round already.
console.log and Math.round are APIs.
console.log is actually implemented in a different language (C++), but that doesn’t matter - its functionality is exposed to us when we write JavaScript, and we don’t need to care how it’s actually implemented or how it works.
Jest provides an API so we can write tests. So we have to find out about the Jest API to start writing tests with Jest.
📝Note
🧐 Other APIs
Try and list other examples of APIs you’ve used since the start of the course. Start a thread in Slack to discuss with your class.
Logging
Learning Objectives
❗Caution
Should combine this with scripts section
Printing to the terminal
To look at values when our program runs, we can use a function called console.log.
💡console.log
console usually means a text interface like a terminal. A log is a written record of something that happened.
So console.log will record something that happens in our program and print it to a text based interface.
console.log logs the result of expressions while our program is executing.
This is very useful for complex programs when we need to check what values expressions evaluate to at specific moments of our program execution.
Let’s see how to use console.log . In a file called example.js, write the name of the function console.log.
console.log;If we run this file with Node, we won’t be able to see anything in the terminal. As with Math.round we need to use the syntax for calling a function. Add brackets after the function name:
console.log("hello there!");We should see the string "hello there!" logged out in the terminal.
Making a choice
Learning Objectives
Let’s return to our password example from the previous section. Our code needs to be able to handle two possible scenarios:
- The user enters the correct password
- The user enters the wrong password
When we design our code we can interpret this as a question:
We need to consider both possibilities when writing our code.
- We should only load the desktop if the correct password is entered. This is called running code conditionally.
- We need to know what to do if the incorrect password is entered.
We don’t need to solve the whole problem at once. First let’s work out how to do something different if the password is correct. We can worry about what we need to do differently once we’ve solved this problem.
💡Tip
It’s easier to search for the solutions to smaller parts of problems than the whole problem.
Programming is all about breaking down problems into smaller pieces which we can solve.
Ordinal numbers
Learning Objectives
🏢 Let’s imagine you’re working in a 10 storey office building. There are 10 different levels. We need a way to describe each level of the building. We start on the ground floor of the building - level with the ground. We use an ordinal number to describe the other levels in the building.
To form the ordinal number we take a number and add the correct
☝🏿 Up from the ground floor, we are then on the 1st floor (first floor) ☝🏽 Up from the 1st floor, we are on the 2nd floor (second floor)
| number | + suffix | = ordinal number |
|---|---|---|
| 1 | st | 1st |
| 2 | nd | 2nd |
What will the ordinal number be for:
a) 21?
b) 40?
c) 49?
d) 13?
Use ordinal numbers to write the days of the month for the following events:
a) Tomorrow b) A week from now c) Easter Sunday 2024 d) When is Eid expected to occur in 2024
- 1st
- 2nd
- 3rd
- 4th
- 5th
- 6th
- 7th
- 8th
- 9th
- 10th
📋 Specification
Let’s consider a function called getOrdinalNumber that needs to work like this:
- it takes one argument - a whole number, like 1, 2, 3, etc
- it returns a string that represents the ordinal number
getOrdinalNumber(1); // returns "1st";
getOrdinalNumber(2); // returns "2nd";
getOrdinalNumber(6); // returns "6th";
The requirements above form a
getOrdinalNumber to behave when it is called with different inputs.
Parameterising a function
Learning Objectives
Our checkPassword function is nice and reusable now with its ability to check any value we pass to it as an argument, but in practice we will see lots of functions which need more than one piece of information to do their job. How we provide this information is critical. In a future sprint we will look at ways of testing our code to ensure we have set everything up correctly but we can avoid a lot of problems by paying close attention to how we use our functions.
Let’s create a new function to work with for this example. In a new file let’s define a function which will print a greeting for someone with a different message depending on what time of day it is.
function greet(timeOfDay, name){
  console.log(`Good ${timeOfDay}, ${name}.`);
}
Ordering
If a function expects to receive two pieces of information then it expects to receive them in the order they are defined. In our example we have said the first argument greet receives will represent the timeOfDay parameter and the second argument will be for name. We can test it to see what happens:
greet("afternoon", "Colin");
// "Good afternoon, Colin."
✍️Exercise: Changing the order of arguments
Try to predict what will happen if we swap the order of the arguments when calling the function.
Answer:
greet("Colin", "afternoon");
// "Good Colin, afternoon."
As far as the function is concerned everything is fine: it needed two pieces of information and it got two, so it’s happy. The output doesn’t make sense to us as users though!
The output may not make much sense, but it could be worse. What might happen if one of the arguments was expected to be a number? If we’re not careful when passing arguments we can cause errors by trying to do something we’re not able to do to a value.
Wrong number of arguments
Some languages are very strict about passing the right number of arguments to a function when it is called. JavaScript is not one of those languages. JavaScript is quite forgiving and will do its best with what we give it.
✍️Exercise: Missing arguments
Try to predict what will happen if we omit the second argument when calling our function. Hint: think about the value of a variable which we declare but never initialise.
Answer:
greet("afternoon");
// "Good afternoon, undefined."
When the function is called timeOfDay and name are both declared but we only have a value to assign to timeOfDay. name will remain undefined while the code is executed.
Now predict what will happen if we omit the first argument.
Answer:
greet("Colin");
// "Good Colin, undefined."
Remember that ordering matters. The interpreter will assign the first value it receives to the first parameter, it doesn’t know there was meant to be something else there first.
✍️Exercise: Extra arguments
Try to predict what will happen if we pass a third argument to our function.
Answer:
greet("afternoon", "Colin", 2026);
// "Good afternoon, Colin."
The function only expects two pieces of information and once it has them it doesn’t care about anything else we give it. Remember about the ordering though! It only expects two values and it will take the first two values, whatever they are.
Default values
There are many reasons why we might be missing a piece of data which is actually quite important for our program. In production code we would usually have several checks in place to ensure we didn’t even try to call our function if something was missing but it never hurts to have another one.
In our greet example we were able to get away with the missing value because we can still print undefined but that won’t always be the case. We can’t add two numbers together if once of them is undefined, for example. To help avoid this we can assign default values to parameters when we define a function. If a function expects to receive a value when it is called but doesn’t it will substitute the parameter’s default, avoiding the value being undefined.
✍️Exercise: Assigning defaults
Research how to assign default values to a parameter and update the function definition so that it prints “user” instead of “undefined” if the name argument is not passed. Hint: The functions page of the MDN docs could be a good place to start!
Solution:
function greet(timeOfDay, name="user"){
  console.log(`Good ${timeOfDay}, ${name}.`)
}
Percentages
Learning Objectives
Let’s begin with this problem:
Given a decimal number I want to convert it into a percentage format.
For example, given the decimal number 0.5 we return the string "50%". Given the decimal number 0.231 we return the string "23.1%".
Restating the problem
Our function must convert any decimal to a percentage. We have used functions already. Here are some functions we’ve used:
| |
All these expressions are function calls: we’re passing input ("hello world" or 3.141) to the functions (console.log or Math.round) to use their functionality. Math.round and console.log are functions that the JavaScript language designers have written and stored inside the language, because everyone needs them all the time.
No such pre-built function converts any number to a percentage, so we must write our own. We’re going to create a function called convertToPercentage with the following requirements:
Given a number input
When we call convertToPercentage with the number input
Then we get back a string representing the percentage equivalent of that number.
Here are some examples:
| |
| |
Useful expressions
It is often helpful to solve a problem in one specific instance before doing it for all cases.
We’re not going to define our function yet. Instead we will work out what our function should do. Then we’ll define a function which does the same thing.
In programming, we always try the simplest thing first. Let’s consider how to convert just one number to a percentage. Look at this variable declaration:
| |
We want to create an expression for the percentage using the value of decimalNumber. To convert to a percentage, we will multiply the number by 100 and then add a "%" sign on the end.
| |
Recalling template literals, the expression in the curly braces will be evaluated first and then inserted into the string, giving us the percentage string.
Now that we’ve solved the problem of converting a single decimal number to a percentage, let’s practice solving other similar problems using expressions.
Create a new JavaScript file so that you can try running the code for yourself.
Calculating the area and perimeter of a rectangle
In one of these new files, let’s make two variables that describe the dimensions of a rectangle:
const height = 10; // 10 is just an example of a value here - your code should still work if you change this to another value.
const width = 30; // Also just an example - your code should still work if this changes.
Using these variables, let’s calculate the area and perimeter of the rectangle.
We can calculate the area and perimeter by creating expressions that use the height and width variables we just created. Hint: read the links above if you don’t know how to calculate area and perimeter of a rectangle.
Finally, we’ll create two more variables: area and perimeter to store the result of the calculations.
const area = FILL_ME_IN;
const perimeter = FILL_ME_IN;
Now, if we change the numbers assigned to height and width, are the area and perimeter values still correct? Try using console.log to print out the value of the variables and then run the script using Node to view the output.
Remember to create a new JavaScript file to run the code for yourself.
Converting pence to pounds
Like the rectangle example, we’ll start by creating a variable to store a price in pence:
const price = 130; // Just an example value. Try changing this value to 0, 10, or 1521, and make sure you still get the right answer from your code.
Now, you should write an expression that calculates the price in pounds. The price in pounds should be shown with 2 decimal places and start with “£”.
Try using console.log to print out the value of price in pounds and then run the script using Node to view the output.
Playing computer
Learning Objectives
To understand how convertToPercentage works we must build a mental model of how the computer executes our code. To build this model, we use a method called
We will use an interactive code visualiser to play computer.
🕹️👣 Step through
In a JavaScript program, each line is an instruction that will have some effect. For example, a line of code with a variable declaration means “store a new variable with this value in memory”. In the interactive widget, arrows are used to show which line just executed and which line is next to be executed.
Click next to see what happens when the computer executes the following program. Pay particular attention to what happens when the function convertToPercentage is called.
🖼️ Global frame
As we step through the program, we keep track of two things: memory and the line that is being currently executed. We keep track of this information using a
The global frame is always the first frame that gets created when our program starts executing. It is like the starting point for our program, the place where code gets executed first. When we run the code above, decimalNumber and convertToPercentage are both stored in the global frame.
🖼️ Local frame
💡recall
Whenever we call a function a new frame is created for executing the code inside that function. In the example above, we call the function convertToPercentage on line 7 and then a new frame is created for convertToPercentage. Inside the convertToPercentage frame, the computer executes the instructions inside convertToPercentage, storing new variables in memory and keeping track of the current line that is being executed.
Refactoring
Learning Objectives
Our checkPassword function is doing its job well but it’s getting quite long. We also need to think about how it will interact with other parts of an application.
Returning a string is fine when we’re printing an output to the console but it’s actually not that useful if we want to do something else with it in code. If another function wanted to use the returned value the workflow would look like this:
We make two comparisons in a row: we ask if two strings match, which produces a string, then we check that string to see what it says. That’s not very efficient. It would be much simpler if our password check gave a “yes” or “no” answer.
In programming we can use the boolean values true and false when asking yes/no questions like this. We can update checkPassword to return these values by refactoring it.
Editing our code
When we refactor code we make changes to its structure without changing how it behaves. In this example we will go slightly beyond what a typical refactor would involved because we will be changing the return values too, but our function will still be doing the same job. Let’s swap the strings for true and false.
const password = "secretword123";

function checkPassword(userInput){

  let response;

  if (userInput === password) {
    response = true;
  } else {
    response = false;
  }

  return response;
}
Calling this function with different arguments will now return either true if the argument matches the value stored in password or false if it doesn’t. So far so good! By making response a boolean we have made our code easier to understand, but also made it less likely that we will make a mistake by trying to match a complex string.
We could go even further and reduce our function’s length. Our if statement is evaluating an expression, and if it evaluates to true we are setting response = true. Likewise if the expression is false. Why not just store the result of the evaluation in response? That would get rid of three lines of code!
function checkPassword(userInput){

  const response = userInput === password;

  return response;
}
💡Understanding changes
We have also switched to use const in the variable declaration since we don’t need to reassign it any more. We can go even further, though. We declare the response variable then immediately return it without using it for anything else. Since we are done with it so quickly, why bother with the variable declaration at all? Why not go straight to returning the expression?
function checkPassword(userInput){

  return userInput === password;

}
Now it’s even shorter! If we really wanted to we could get the whole thing on one line but we’ll leave that for now. We’ll find out how we can do that with a different way of declaring functions in a future module.
There is a trade-off here. We have made our function much shorter but this often happens at the expense of readability. Don’t be tempted to refactor too far and make things difficult for anyone (including yourself) reading your code in the future.
Refactoring repetition
Learning Objectives
Let’s look at our code, which passes all of the tests we’ve written:
| |
Inside the formatAs12HourClock function we do exactly the same thing twice.
🕹️Exercise
formatAs12HourClock that do exactly the same thing.There are a few reasons this isn’t ideal.
- It’s not clear what this value represents. You can read it and work it out, but that takes some time.
- Doing the same thing twice is slower than doing it once.
- In the future if we need to change this code’s implementation, we would need to change it twice.
Right now our code assumes the hours in a time are always two digits (like05:00). What if we wanted to support single-digit hours, like5:00? We would need to make the same change to both lines. It would be easy to change one line and forget the other, which would lead to a bug.
Refactor
Once your code passes your test, look for ways you could make your code better. This doesn’t mean changing what it does - the code works. It means changing how it’s written.
This is called
We can refactor our code to remove this duplication by introducing a variable:
| |
This code does exactly the same thing as the previous code. But it is better in a few ways:
- We can now tell more easily what this expression represents. The variable name conveys: it’s the hours from the time.
- We only compute the hours once, not twice, which will be a little bit faster.
- If we need to change how we identify the hours (e.g. to support single-digit hours), we only need to update one bit of code. Both lines 3 and 4 will automatically use the same value, because they’re referring to the same variable.
💡Code Quality
Whenever you finish implementing a sub-goal, or a goal, read your code and look for ways to refactor it.
This will make your code easier to continue working on.
Returning from a function
Learning Objectives
We need a way to access the value that is created inside checkPassword. To access values created inside functions, we use the return keyword. When we return something from a function we make it available at the point the function was called.
Let’s undo our global variable changes from the last section and add a return statement to the function:
const password = "secretword123";

function checkPassword(userInput){

  let response;

  if (userInput === password) {
    response = "Correct password entered";
  } else {
    response = "Incorrect password, please try again";
  }

  return response;
}
We haven’t quite fixed everything though. If we call the function and try to print response like before we’ll still get a ReferenceError.
Using the output
We sometimes refer to the value returned by a function as its output. We can store that output in a variable.
const output = checkPassword("secretword123");Now the value returned by our function is stored in the output variable and can be handled just like any other variable. Let’s try printing it to check everything worked:
console.log(output);
// "Correct password entered"
Success!
Reusing the function
Learning Objectives
Our goal is for convertToPercentage to be reusable for any number. To check this goal, let’s call convertToPercentage with different arguments and check the return value each time:
| |
When we execute this code we want to log the target output for each input: 0.5 and 0.231:
50%
23.1%
However, given the function’s current implementation, we get the following logs:
50%
50%
🌍 Global scope
At the moment, decimalNumber is in the
🎮 Play computer
Play computer and step through the code to check why we get the output below:
50%
50%
Running scripts
Learning Objectives
It’s time to write our first lines of JavaScript!
There are some tools available which will enable us to write code and instantly see the results. These are called REPLs - Read, Evaluate, Print and Loop. These are great for quickly checking something but not very practical for production uses.
Usually our programs will have many instructions which we want to keep and re-run instead of typing them out each time. So we save our instructions in files. We can run these files from the terminal.
We use the node command to run a JavaScript file in the terminal. A JavaScript file ends with the .js file extension.
Let’s suppose we have a file hello_world.js. We run the command node hello_world.js. This terminal command is an instruction to execute the program written inside hello_world.js.
Printing to the terminal
Our first program will print the text “Hello World!” in the terminal. First we need to create a file to work in.
Open a terminal. You can either do this using your Terminal app or in VSCode, it doesn’t matter. Navigate to the prep directory you created in the last section and create a file called hello_world.js.
💡Tip: pwd
pwd command to print working directory if you lose track of where you are in your file system.cd Module-Onboarding/prep # Replace this with your file path if it's different
touch hello_world.jsOpen your new file in VSCode.
JavaScript prints values to the terminal using a function called console.log.
📖Definition: console.log
console usually means a text interface like a terminal. A log is a written record of something that happened.
So console.log will record something that happens in our program and print it to a text based interface.
console.log prints the result of expressions while our program is executing. Usually we will interact with our programs using some sort of graphical interface like a web browser so we won’t use this function often, but it is a very useful tool to help us solve problems in our code. It lets us check what values expressions evaluate to at specific moments of our program execution.
Let’s see how to use console.log . In your hello_world.js file write the name of the function console.log, a set of parentheses () and the message to be printed.
console.log("Hello World!");📝Note: Semicolons
Note that we have added a semicolon (;) at the end of the expression. Different programming languages handle semicolons in different ways: in some languages they are essential, in others including them will cause an error.
JavaScript code will run with or without a semicolon at the end of expressions but it’s good practice to include them. They help to keep your code organised and are helpful for anyone reviewing your code. Plus it’s good practice if you ever use a language like Java where they are required!
Now switch to the terminal and run the file using node:
node hello_world.js💡'Error: Cannot find module
pwd to check you are in the right directory. If not, navigate to teh correct place using cd and try again.We should see the string "Hello World!" logged out in the terminal. Congratulations, you have written your first JavaScript program!
✍️Exercise: Running JavaScript files
Let’s try again from the beginning
- In your terminal, create a new file called
facts.js. - Pick one of your fun facts from the Git sections in the first sprint
- Run the file using Node.
Saving expressions
Learning Objectives
In programming we often want to reuse our work. Consider the string: "Hello there"
Suppose we want to create different greetings for different people, like: "Hello there, Alicia" or "Hello there, Barney"
We can use a variable to store this string and reuse it. A variable is a label for a piece of data. We assign a piece of data to a label and then refer back to this label, in place of the data.
Declaring variables
We can create a variable in our program by writing a variable declaration. A declaration is an instruction that binds an identifier to a value, like this:
const greeting = "Hello there";Break down the different syntactic elements of this variable declaration:
constis a keyword used to indicate we’re creating a variable.greetingis the identifier - it can be used to refer to a variable after it has been declared.=is the assignment operator. It means assign to the labelgreetingthe value of the expression on the right hand side."Hello there"- this is the expression whose value we’re assigning to the labelgreeting.
✍️Exercise: Declare a variable
greeting.js. Open the file in VSCode and declare a variable called greeting like we did above.Accessing variables
Our data is stored in a variable, so how can we use it again later?
To access the data stored in a variable we just need to type the variable’s name. When our code is executed the appropriate value will be inserted and the expression will be evaluated. Try it now with your new variable:
console.log(greeting);"Hello there" has been printed to the terminal even though we didn’t explicitly write that in the code.
Using variables in expressions
Accessing variables can form part of complex expressions. Let’s add a second variable called name to our program. We’ll also add this variable to our console.log call so we print the greeting and the name together.
const greeting = "Hello there";
const name = "Alicia";
console.log(`${greeting}, ${name}`);
We just used backticks to create a template literal.
A template literal places ${expressions} inside strings;With template literals, we can insert expressions into strings to produce new strings. Any time we want to reference a variable inside a template literal we use a dollar sign $ and a set of curly braces {}. We can put any expression (e.g. a variable name) inside the curly braces. The value that expression evaluates to is then placed inside the string.
When an operation uses an expression, that expression is immediately evaluated, and how it was written is forgotten about. Each of these expressions evaluates to the same thing:
"Hello there, Alicia";
`Hello there, ${name}`;
`${greeting}, ${name}`;
greeting + ", " + name;
📖Definition: String literal
In the first example we don’t use a variable or a template to create a string. Instead we write a string "Hello there, Alicia".
A sequence of characters enclosed in quotation marks is called a string literal. "Hello there, Alicia" is a string literal.
Similarly, 10 is a number literal.
Reassigning a variable
Let’s say we want to greet people in a different way. That would mean changing the value of our greeting variable. This is a very common thing to do, in fact many of the programs you write will need you to do this.
We reassign a variable using the = operator:
const greeting = "Hello there";
greeting = "Good morning"
If we try to run our code now we’ll see an error (more on these at the end of this sprint). What went wrong?
The const keyword means that our variable is a constant - we can’t change its value! If we need to reassign a variable we need to use the let keyword when declaring the function instead.
let greeting = "Hello there";
greeting = "Good morning"
Now it works!
The first line of this block is the variable declaration, the second line is a statement. Note that we don’t need to use let again when reassigning the variable.
Scope
Learning Objectives
At the moment our password checking function does what we need it to but is quite limited. The only way it can let us know if the input was correct or not is by printing a message, but what if another part of the program needs to know?
For that to happen we will need to store the response in a variable, so let’s make some changes to our code:
const password = "secretword123";

function checkPassword(userInput){

  let response;

  if (userInput === password) {
    response = "Correct password entered";
  } else {
    response = "Incorrect password, please try again";
  }
}
Now we can call our function then try printing response:
checkPassword("secretword123");

console.log(response);
It looks like we have a problem though…
ReferenceError: response is not defined
We definitely did define response though, it’s right there above the if statement! It’s the only variable which throws this error: if we print password the value will be displayed. So why does it work for one and not the other?
We get an error because of the variable’s scope. Scope determines where a variable can be accessed from in our code. When we define passwordChecker we also define a local scope - the block of code enclosed inside passwordChecker’s function body. This means any variables we declare inside that local scope can only be accessed within the same block. If we attempt to reference a variable from outside the scope where it was declared we get a ReferenceError.
The response variable is declared inside passwordChecker’s local scope so when we try to print it the ReferenceError is thrown. The password variable is declared outside the function’s local scope so we can access it without the error being thrown.
Global Scope
There are two ways in which we could fix this. The first is to move the response declaration outside of the function. That means it is no longer within the function’s scope but that could cause some problems for us in future. What happens if the code in the function isn’t executed? Our variable would always have the value undefined and we may not be prepared to handle that.
The second is to remove the declaration altogether and handle declaration and assignment at the same time in the if block. TRy it now and see what happens!
const password = "secretword123";

function checkPassword(userInput){
  if (userInput === password) {
    response = "Correct password entered";
  } else {
    response = "Incorrect password, please try again";
  }
}

checkPassword("secretword123");

console.log(response);
No error, and the correct value is printed. So why does this work?
When we declare a variable using const or let it gives the variable local scope. When we don’t use a keyword the variable has global scope instead. Now there are no restrictions, the variable can be accessed from anywhere. That doesn’t sound very secure though, does it?
We have a stand-off: on one side our code is secure but we can’t access the value we need, on the other we can access the value but so can everything else. We need to make some changes to our function to fix this.
Solving Problems with Functions
Learning Objectives
To get the most out of this workshop - don’t just watch, code along 💻 You can use the code samples below as a starting point.
Exercise 1
// Write a function that will calculate the area of a rectangle
//   given it's width and height

let width = 3;
let height = 4;

function calculateArea() {
  const area = width * height;
}

console.log(area);
Exercise 2
function capitaliseFirstLetter(name) {
  console.log(name[0].toUpperCase() + name.substring(1));
}

function createGreeting(name) {
  const result = capitaliseFirstLetter(name);
  return `Welcome ${result}`;
}

const greeting = createGreeting("barath");
console.log(greeting);
Starting a project
Learning Objectives
Let’s start a brand new project in a directory called ordinal-testing-example and create a file called package.json in our project.
- Open your terminal and ensure you’re inside the
CYFdirectory you created earlier in the course. - Make a new directory on your local machine called
ordinal-testing-example. - Change directory into
ordinal-testing-exampleand double-check your current working directory.
% pwd
.../CYF/ordinal-testing-example
💡Package
package.json stores useful information about our project, like the name, description, and version. It is written in the JSON format.- Create a
package.jsoninordinal-testing-example. - Make sure it contains a name and description.
👉🏽 Need help? Follow step by step instructions
- Create a
package.jsonfile in your project directory:
touch package.json- Add a name to it like this:
{
  "name": "ordinal-testing-example"
}- Add a description:
{
  "name": "ordinal-testing-example",
  "description": "An example application showing how to write tests using the jest framework"
}
We can continue adding more information about our project as the project grows. For now, double-check we only have a package.json in our project:
% ls
package.json
Sub-goal #2
Learning Objectives
Now we can think about what we do when we’ve identified a time is after midday.
Earlier, we observed what to do when the time goes beyond midday: subtract 12 from the hours time to get the new hours for the 12 hour clock time.
Before writing code, we can define our approach in steps:
Starting with an input like "23:00":
Now we can format the string using our approach from earlier:
we’ll need to append "pm" to the string expression and subtract 12 from the hours. So we get the following:
if (Number(time.slice(0, 2)) > 12) {
  return `${Number(time.slice(0, 2)) - 12}:00 pm`;
}
The return statement above implements the following steps we set out earlier:
Now we can re-run our assertions from earlier to check our function behaves as target.
Terminal interface
Learning Objectives
Programmers need interfaces to ask computers to do things. A computer terminal is an interface where programmers can issue commands to a computer. Because users enter text instructions and receive text output, we say that the terminal is a text-based interface. It is also often referred to as the command line.
Opening the Terminal
The Terminal Application
Every computer has a built-in application which we can use as a terminal. On Mac and Linux this app is conveniently called “Terminal”!
When you open the terminal you will see a blank screen with a cursor waiting for input. You can type instructions here and the computer will carry them out. Some instructions are quite simple, others can be quite complex. Anything you can do in an application like Explorer can be done here by typing a command, and you can often do it much quicker in the terminal! The example below shows a user listing the contents of a directory.
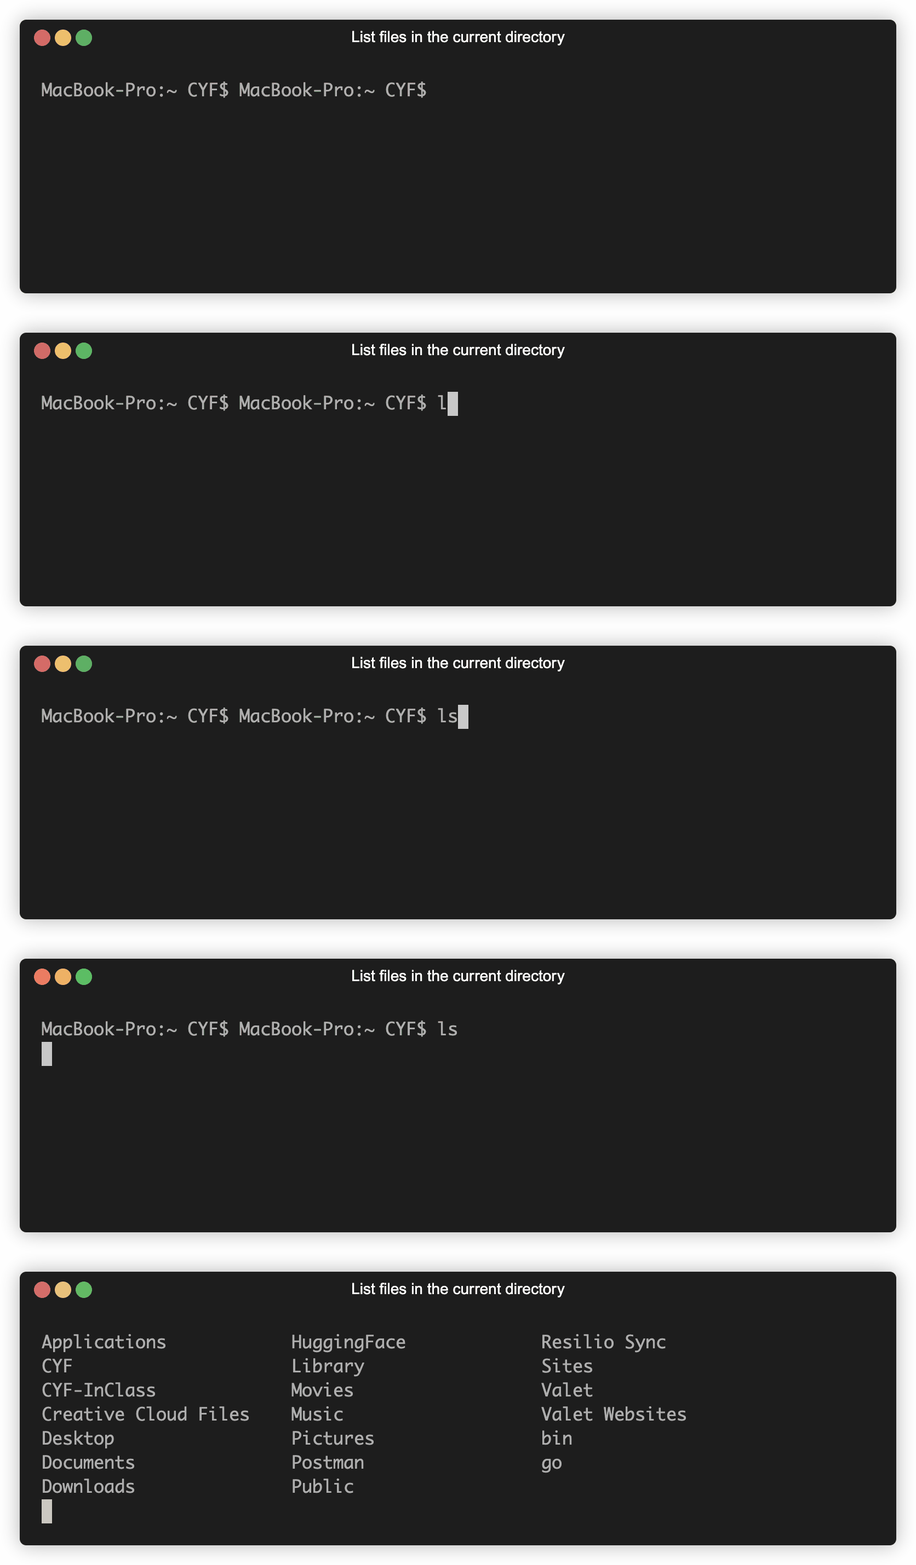
The Terminal in VSCode
We can also open a terminal within VSCode, meaning we don’t need to switch between applications while we work. This is really useful when we need to refer back to the results of previous commands, such as logging output or test results. Anything we can do in the terminal app can be done within VSCode.
You can open a terminal in VSCode by clicking Terminal -> New Terminal.
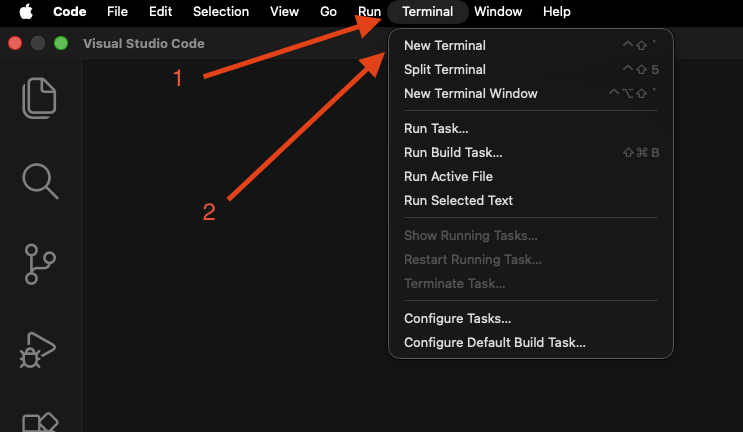
Writing Commands
We can issue commands to the computer using the terminal. These commands are instructions that the computer knows how to interpret. As we go through the course we will introduce some commands which need particular tools to work, but for now we will focus on exploring our file system.
One of the most useful commands is pwd, for print working directory. This will tell you where you are in your file system, like pulling out a map with a big “you are here” sign on it.
The ls command means “list the files and directories in the current directory”.
To move from one directory to another we can use the cd (change directory) command. This is an example of a command which needs some extra information - we need to tell it where we want to go! For example, we would navigate to our Downloads folder using cd Downloads.
📝Casing
downloads and another called Downloads have totally different names! This is a really common cause of bugs, so if something doesn’t work the way you expect you should always check your spelling!We can make our own new directories using the mkdir command. When we use this command we need to provide a name for our new directory, eg. mkdir my_stuff.
We create new files using touch, and just like with directories we need to provide a name. An important part of creating a file is providing a file extension. This tells the computer what kind of file we have created, for example document.txt will be a text file and picture.png will be an image. You can create any kind of file using the terminal.
📝Naming
Coming up with names for things is one of the most challenging aspects of programming. In general a good name will make it obvious what a file contains without being too long, although there will be occasions where a file needs to have a specific name in order for something to work.
- ✅
shopping_list.txt - ❌
things_i_need_to_by_in_tesco_this_weekend_version_2.txt - ❌
stuff.txt
✍️Exercise - Terminal Practice
Visit Terminal Temple and try to complete the following tasks. Don’t worry if something goes wrong, you can reset by pasting resetterm --force into the interface and pressing enter.
- Move into the
Documentsfolder. - Create a new directory called
study-plans. - Move into your new directory.
- Create two new files:
week1.txtandweek2.txt. - Move back to the
Documentsdirectory - this will need some further research! - Delete
empty-file.txt. This will also need some research! - Check that the file was deleted by listing the contents of the directory.
Testing a sub-goal
Learning Objectives
Earlier we defined a sub-goal to find a value for the hours from the time input. We’ve found that Number(time.slice(0,2)) is an expression that evaluates to the hours from time. So we can write an if statement using this expression:
if (Number(time.slice(0, 2)) > 12) {
}
If the time is "23:00" then the expression Number(time.slice(0, 2)) > 12 will evaluate to true and the body of the if statement will be executed.
This if statement is implementing the following part of the diagram from earlier:
Before we worry about how we handle times in the afternoon, we can check that we’ve solved this sub-goal.
We can check that we are correctly identifying times in the afternoon by adding in our if statement (which we think is correct), with a placeholder body:
| |
If we run our code, we expect the current output of the 23:00 test-case to have changed. It won’t be correct - the assertion will still fail. But if it hasn’t changed, we know our if statement is wrong.
% node clock-example.js
Assertion failed: current output: Don't know how to handle times in the afternoon yet, target output: 11:00 pm
Even though we know the code on line 3 is incorrect, this was a useful step. It allowed us to run our code more often, and check that we’re on the right track.
remember
Run your code as often as you can.
Make small changes and run your code.
Sometimes we write code we know we will delete because it lets us get feedback sooner.
Now we can focus on just one problem: how to handle times after midday (i.e. fixing line 3). We don’t need to worry about both detecting the time and handling it.
If the output of this assert still printed "23:00 am" we would have stopped here and debugged that. Again, we could focus on just one problem.
Testing frameworks
Learning Objectives
To help us think about the requirements of getOrdinalNumber, let’s consider one case:
💼 Case 1
const input = 1;
const currentOutput = getOrdinalNumber(input);
const targetOutput = "1st";
Case 1 states that when getOrdinalNumber is called with an input of 1, it has a target output of “1st”. Our first step is to check that getOrdinalNumber works as we have stated.
We have used console.assert to write assertions to write tests for our code before. console.assert is a useful building block, but it is limited. Now we will write tests using a
🔑 A test is any piece of code that runs an assertion on the code we’re testing
We want our tests to:
- be easy to write
- be easy to read
- give clear feedback on what the current output is
- give clear feedback on what the target output is
- allows us to easily write multiple test cases
A test framework will help us build test cases like this.
🧑🏽🧑🏿 Dialogue
We can use a short dialogue to think about why we want to use a testing framework:
- 🧑🏽 Büşra
- Ali, looks like I need to implement a function.
- 🧑🏿 Ali
- Cool. How are you going to check it works?
- 🧑🏽 Büşra
- I’m going to use tests to check that the function gives the target output as described in the specification
- 🧑🏿 Ali
- Seems wise. How are you going to write a lot of tests efficiently?
- 🧑🏽 Büşra
- I’m going to use a testing framework to write test cases quickly. The framework will make sure that the tests give fast, reliable feedback.
Testing Workshop
Learning Objectives
To get the most out of this workshop - don’t just watch, code along 💻 You can use the code samples below as a starting point.
Exercise 1
// Create a function that takes three numbers as parameters
//   and returns the largest of the three
Exercise 2
- Start with an empty folder
- Create a new NodeJS project:
npm init -y - Install Jest as a dependency:
npm i jest --save-dev - In package.json, change
"test": "echo \"Error: no test specified\" && exit 1"to"test": "jest" - Create a file for our first exercise:
example1.test.js - You can run your tests using
npm test
Using an interface
Learning Objectives
We want to use computers without understanding exactly how they are built. Every day we ask machines to do things, and usually we have no idea how these machines work. We could not use modern technology if we had to understand it completely before we could use it; it would take too long! Instead we use
Think about a cash machine (ATM). We go to a hole in the wall with a screen and a keypad. The screen and the keypad are the user interface. We press the buttons and ask the machine to do things - like giving our balance, or withdrawing some money from an account. We don’t need to understand how the information it tells us comes on the screen.
✍️Exercise
Define the user interface for these devices:
- a calculator
- a microwave
- a desktop lamp
- Alexa
- ChatGPT
Using packages
Learning Objectives
When writing software, we continually make use of software written by other developers. We can call these
We use packages so that we don’t have to solve every problem ourselves. Other people have often solved some things we need to do really well. Using other people’s solutions to parts of a problem means we can focus our time and effort on what’s special about our problem.
Imagine we wanted to work out what the time is in a user’s city. Instead of writing code to work out the time for every city’s time zone (and when they change!), we can use a package some “city time” experts have written, and which they keep up to date.
Different programming languages give developers different ways of accessing packages for use in their code. We will use
npm, downloads and manages useful packages of code from the npm registry.
Writing an assertion
Learning Objectives
We now have 2 new concepts: booleans and comparisons. From these concepts, we can now write an assertion about the function formatAs12HourClock.
🔑 An assertion is a check that our code behaves in a particular way: this check can either succeed or fail.
So far we’ve used the log function console.log. We can write assertions using another function: console.assert. The documentation says that console.assert writes an error message to the console if the assertion is false. If the assertion is true, nothing happens. As 10 + 32 === 42 evaluates to true, no message will be written to the console.
const calculation = 10 + 32;
const result = 42;
console.assert(calculation === result);Experiment with assertions
const calculation = 10 + 32;
const result = 42;
console.assert(calculation === result);
Change the value assigned to the result variable to make the assertion fail. Check the output you get in the console.
👉🏿 Keep Going
Let’s look at an example using formatAs12HourClock:
function formatAs12HourClock() {}
console.assert(formatAs12HourClock("08:00") === "08:00 am");
Predict and explain if the assertion will succeed or fail. Pay particular attention to the return value of formatAs12HourClock.
Clarity with arguments
It would be useful to have more information as to why this assertion failed. We can pass an additional argument to console.assert:
function formatAs12HourClock() {}

console.assert(
  formatAs12HourClock("08:00") === "08:00 am",
  `current output: ${formatAs12HourClock("08:00")}, target output: 08:00 am`
);
Let’s break down these arguments to make sense of what’s going on:
- first argument -
formatAs12HourClock("08:00") === "08:00 am"- the condition we’re checking - second argument -
`current output: ${formatAs12HourClock("08:00")}, target output: 08:00 am`- a message string that will be logged to the console if the condition is false.
🧹 Refactor
We can tidy up the assertion even further. As we’re reusing the same expressions, we can store their result in variables with meaningful names so we can reuse them:
| |
Execute this code; we now get a log in the console:
Assertion failed: current output: undefined, target output: 08:00 am🧰 Implementing the functionality
On line 3, the function is being passed a single argument "08:00". But our function ignores it: it doesn’t declare any parameters. We can parameterise the function and label the input as time:
function formatAs12HourClock(time) {}According to our assertion, when we call our function with an input of "08:00" we need to create an output of "08:00 am". If we add "am" to the time, we’ll get the target output. We can update our function with a template literal, set the return value and then re-run our code including our assertion to check the function is returning the correct value.
📓 We can and should continually check our assertions to see if our function’s current output meets our target output.
| |
✅ Nothing is printed to the console, so this assertion is passing 😎
🕹️Try yourself
💼 Checking different cases
So far we’ve only created assertions that check the function’s behaviour for times between midnight and midday. In these cases, there is a pattern: take the current time and add " am" to the end.
But this isn’t the pattern we need to follow for all times. To make sure our function works for all times, we need to write more assertions.
We need to assert that the function behaves correctly when the time is later than midday.
Before we think about any code, we should think about our problem. Separating problem and code lets us focus better. First we can focus on the data. Then we can focus on the code.
First, let’s think of an example time in 24 hour clock - we’ll pick 23:00.
Next, let’s work out what we expect our example time to be in 12 hour clock: 11:00 pm.
Now that we’ve thought about the problem, we can write the code. Let’s create an assertion for our function when passed an input of "23:00":
| |
Save this code to a file. Before you run it in Node, write down what you think will happen. Then run it with Node - compare what you saw with what you predicted.